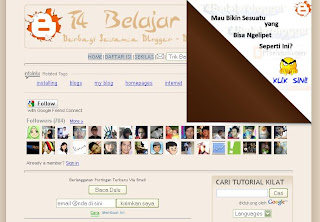
Teman-teman juga bisa menemukannya di blog ini. Yang seperti ini lho...

UPDATE....
Untuk membuat halaman blog teman-teman seperti di atas caranya gampang. Ikuti langkah2 berikut:
1. Login ke blogger >> Tata Letak >> Edit HTML >> Expand widget template
2. Cari kode
| <b:skin><![CDATA[ |
<script src='http://sites.google.com/site/software2iqbalinc/javascript/script_ditunjuk_ngelipet_t4belajarblogger.js' type='text/javascript'/>
<script type='text/javascript'>
$(document).ready(function(){
$("#pageflip").hover(function() {
$("#pageflip img , .msg_block").stop()
.animate({width: '307px',height: '319px'}, 500);
} , function() {
$("#pageflip img").stop()
.animate({width: '50px',height: '52px'}, 220);
$(".msg_block").stop()
.animate({width: '50px',height: '50px'}, 200);
});
});
</script>
3. Lalu cari lagi kode
| ]]></b:skin> |
#pageflip {
position: relative;
}
#pageflip img {
border: none;
width: 50px; height: 52px;
z-index: 99;
position: absolute;
right: 0; top: 0;
-ms-interpolation-mode: bicubic;
}
#pageflip .msg_block {
width: 50px; height: 50px;
position: absolute;
right: 0; top: 0;
background: url(https://blogger.googleusercontent.com/img/b/R29vZ2xl/AVvXsEiP9nyABg9fs9GvcxJm5LfiHydyJzel3WBSYDJLolnq8Q1gPIJXySV9hkuRFtk2vgx5EhhqImhM48A53J_KFxJD6SoqZZ0VXQ6SOkrfcWHtt5mT2vmuqDh9V0N_RHT5gxK4eRNk8YtiOx1P/) no-repeat right top;
text-indent: -9999px;
}
4. Cari kode
| <body> |
<div id='pageflip'>
<a href='http://feedburner.google.com/fb/a/mailverify?uri=tutorialbloggingdiblogger' target='_blank'>
<img alt='' src='https://blogger.googleusercontent.com/img/b/R29vZ2xl/AVvXsEigsNRfsY_Pq2xD764E8YtuWMorePLE6QH8CQ4ptb8IeqBvDKgwPVIym6FlursfEmwpzDddx-0pKAaHsPDFIrg16wVuxGIFQA_hd6r4hUsO_vS3yWQ3JS2zaBu9_PMqyyonztS03RlMJcsG/'/>
<span class='msg_block'/>
</a>
</div>
*Ganti yang berwarna Ijo dengan Link yang anda inginkan. Saran: Link RSS atau
link berlangganan.
5. Simpan hasil kerjaan anda.
Sekarang silahkan lihat blog anda, bagaimana....baguskan?
Untuk mengganti gambar dinding, teman-teman bisa mengganti URL berikut:
#pageflip .msg_block {
width: 50px; height: 50px;
position: absolute;
right: 0; top: 0;
background: url(https://blogger.googleusercontent.com/img/b/R29vZ2xl/AVvXsEiP9nyABg9fs9GvcxJm5LfiHydyJzel3WBSYDJLolnq8Q1gPIJXySV9hkuRFtk2vgx5EhhqImhM48A53J_KFxJD6SoqZZ0VXQ6SOkrfcWHtt5mT2vmuqDh9V0N_RHT5gxK4eRNk8YtiOx1P/) no-repeat right top;
text-indent: -9999px;
}
Semoga Bermanfaat []
Sumber Trik:[sohtanaka.com]
Tags: cara membuat page peel effect, cara membuat halaman kelipat, membuat halaman yang melipat, cara membuat page peel effect dengan jQuery, tutorial page peel effect

0 komentar:
Post a Comment
Anda sopan saya segan..Titip Alamat blog anda disini pasti akan saya kunjungi balik